
Update 2021/2/10: Microsoft stopped creating images for Docker in the summer of 2020. We now publish artifacts, which can be used to spin up containers and BcContainerHelper has replaced NavContainerHelper. This blog post reflects the old way of using NAV/BC on Docker and references NavContainerHelper, which is outdated.
This blog post will take you through the steps needed to convert a C/AL solution to an AL extension. When moving a solution from C/AL to AL, it is important that you first move the C/AL solution to the version of Business Central you want to utilize for the move.
Note, this blog post doesn’t describe the code changes you need to do, it mainly focuses on the process for moving the C/AL code to AL.
Create a container with the solution you want to convert
I will use Business Central Spring release for the move and my solution was originally created in NAV 2017 CU3. The first blog post in this series explains how you can move your solution from NAV 2017 CU3 to Business Central, but I am sure most partners have mechanisms and processes in place to perform this move. If you didn’t go through the process in the first blog post, you can create a container with the result of the first blog post by running this script:
# Settings
$imageName = "mcr.microsoft.com/businesscentral/onprem:1904-rtm"
$auth = "NavUserPassword"
$credential = New-Object pscredential 'admin', (ConvertTo-SecureString -String 'P@ssword1' -AsPlainText -Force)
$licenseFile = "C:\temp\license.flf"
$demoSolution2Path = "C:\ProgramData\NavContainerHelper\DemoSolution2.txt"

# Create Business Central container
New-NavContainer -accept_eula `
                 -imageName $imageName `
                 -containerName "bc" `
                 -licenseFile "C:\temp\license.flf" `
                 -auth $auth `
                 -Credential $Credential `
                 -updateHosts `
                 -includeCSide
#
# Import and compile objects
#
if (!(Test-Path $demoSolution2Path)) {
    Download-File -sourceUrl "https://bcdocker.blob.core.windows.net/public/DemoSolution2.txt" -destinationFile $demoSolution2Path
}
Import-ObjectsToNavContainer -containerName "bc" -objectsFile $demoSolution2Path
Compile-ObjectsInNavContainer -containerName "bc" -filter "Modified=Yes"
Create a development container
Next up, I need to create a development container for my AL extension. I will not be doing any changes in C/AL, meaning that I do not need to use -includeCSIDE and I don’t need -enableSymbolLoading. I also won’t need -includeAL as I won’t be doing base app modifications in AL.
# Settings
$imageName = "mcr.microsoft.com/businesscentral/onprem:1904-rtm"
$auth = "NavUserPassword"
$credential = New-Object pscredential 'admin', (ConvertTo-SecureString -String 'P@ssword1' -AsPlainText -Force)
$licenseFile = "C:\temp\license.flf"

# Create Business Central container
New-NavContainer -accept_eula `
                 -imageName $imageName `
                 -containerName "mydev" `
                 -licenseFile $licenseFile `
                 -auth $auth `
                 -Credential $Credential `
                 -updateHosts
Create an AL project
Grab the AL extension from the container (if you don’t already have it) and install the .vsix in VS Code. In VS Code, use Ctrl+Shift+P and use AL Go! to create a new project.
Select your own server and modify launch.json to match your container settings, download symbols and delete the HelloWorld.al file: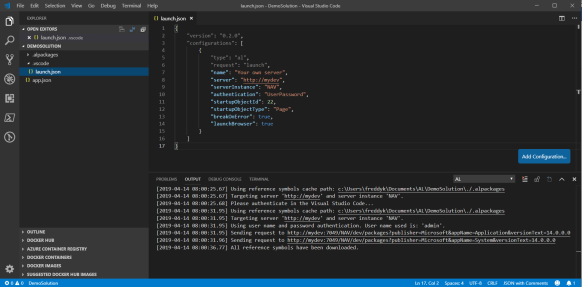
Convert your C/AL solution to an AL extension
In NavContainerHelper, you will find a function called Convert-ModifiedObjectsToAl, which will export the objects matching a filter (default is modified=Yes) and run Convert-Txt2Al on the resulting files. Running this command:
Convert-ModifiedObjectsToAl -containerName "bc" -sqlCredential $credential -startId 50100 -alProjectFolder "C:\Users\freddyk\Documents\AL\DemoSolution"
will populate my AL solution with the files from my demo solution.
Post-Conversion modifications
As we saw during preparations, the demo solution included a menusuite item, which isn’t automatically converted. I will have to open the Directions Sessions List and add ApplicationArea and UsageCategory: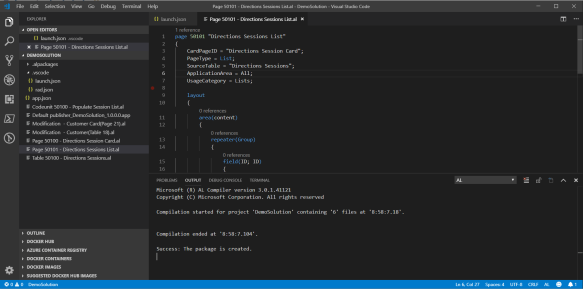
Compile and publish your AL extension
Pressing F5 compiles and publishes the app and starts the Web Client. Searching for Directions Session List and opening the list reveals that the initialization code has run and the table has been populated:
Conclusion
Extensions is the future and if possible you should move your solution to extensions. If, for some reason it isn’t possible to move your solution to an extension at this time, you can also move your solution to code customized AL as described in this blog post.
Enjoy
Freddy Kristiansen
Technical Evangelist

Pingback: C/AL to AL – preparations… | Freddys blog
Pingback: C/AL to AL code customizations | Freddys blog
Hello Freddy,
Thanks for your job to helping us become “AL Ready”.
I am currently following your blog series and I have two remarks :
> After getting the AL files, user must delete the exported objects into the C/Side Client, otherwise he will not be allow to compile (error : “object with the same name exist…”). Isn’t it?
> Is it possible to include in your NavContainerHelper module, the following script (from the DVD) :
Import-module -Name c:\dvd\WindowsPowerShellScripts\WebSearch\TransitionMenuSuiteObjectsForSearch.psm1
Set-ObjectPropertiesFromMenuSuite -RoleTailoredClientFolder -DataBaseName -OutPutFolder ?
Thanks for your feedback 😉
LikeLike
When getting the AL objects, I do not have a reference to the application in app.json and therefore no duplicate symbols.
I will look at the module, thanks
LikeLike
Unfortunately, that module is not part of the docker container. I will discuss with the team on how we can do this.
LikeLike
Pingback: Business Central on Docker for non-experts… | Freddys blog
Pingback: Upgrading to 15.x from 14.x C/AL – our NAV TechDays 2019 demo | Freddys blog