C#
-
Connecting to NAV Web Services from the Cloud–part 5 out of 5
If you haven’t already read part 4 (and the prior parts) you should do so here, before continuing to read this post. In this post, I am going to create a small Windows Phone 7 application, which basically will be a phone version of the sidebar gadgets from this post. When we are done, your Windows Phone 7 will look like: During the other posts, I have been describing how to make the Proxy and one way of securing this....
-
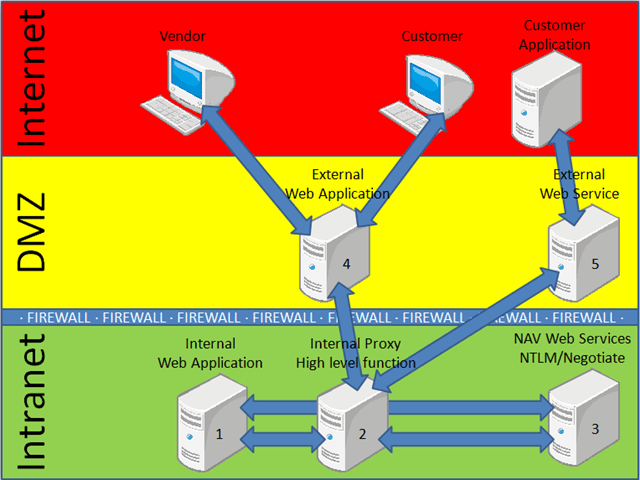
Web Services Infrastructure and how to Create an Internal Proxy
I am NOT an expert in how to setup a secure network and I do NOT know a lot about firewalls, DMZ setup and all of these things, but I have seen a lot in my 25 years of working with computers and the following (absolutely non-exhaustive) gives a good picture of a common network situation of companies, who wants to interact with customers and partners through Web Applications and/or Web Services. DMZ can be at the customer site or...
-
Connecting to NAV Web Services from Silverlight 3
Please read this post to get a brief explanation of the scenario I will implement in Silverlight. Yes, yes – I know it isn’t a fancy graphical whatever as Silverlight should be, but to be honest – I would rather do something crappy on purpose than trying to do something fancy and everybody would find it crappy anyway:-) Getting started with Silverlight http://silverlight.net/getstarted – is your friend. Go to the web site and click this button: Or click the image...
-
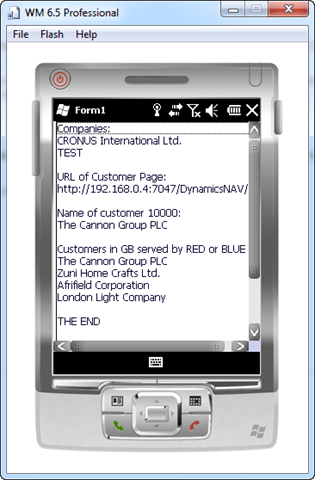
Connecting to NAV Web Services from Windows Mobile 6.5
It is kind of embarrassing that I write a post about how to connect to NAV Web Services from Windows Mobile 6, when Windows Mobile 6.5 has been out for almost half a year (that’s how much a gadget person I am:-)) I just downloaded the 6.5 SDK from here and tried out the exact same application as I wrote for Windows Mobile 6 in this post and everything seems to work just fine, so please follow the steps in...
-
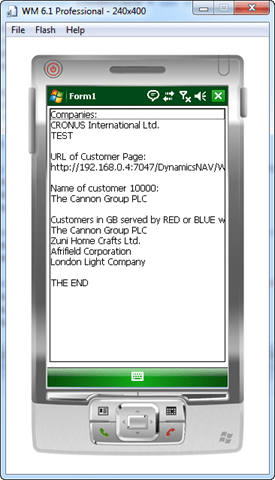
Connecting to NAV Web Services from Windows Mobile 6
I have created my very first Windows Mobile App! This is running in an Emulator using the Professional SDK. I also tried to deploy the solution to my physical device (my Smartphone), which also worked: To be honest, the biggest challenge is to setup everything so that you can get going. A couple of useful links to get going Location to download Windows Mobile 6 SDK: http://www.microsoft.com/downloads/details.aspx?FamilyID=06111a3a-a651-4745-88ef-3d48091a390b&DisplayLang=en The Windows Mobile 6 SDK is not included in Visual Studio 2008, you...
-
Logging the XML generated from .net or received from NAV WS
When working with Web Services using languages who doesn’t natively have Web Services support (like Javascript and NAV self) you have to create a SOAP envelope yourself in the correct format. Of course you can do so by looking at the WSDL, understanding SOAP and using theory – or… – you can create a small C# application, invoke the Web Service you want to and see what XML .net creates for this. You can also see what XML you get...
-
Connecting to NAV Web Services from C# using Service Reference (code version)
You should read the post about connecting to NAV Web Services from C# using Service Reference (config file version) before continuing here. Code is king As you saw in the other post, the config file was pretty complicated and although it is editable by hand and as such could be modified at installtime or whatever, I actually prefer to capture a number of these settings in code and only have very specific values in a config file (like f.ex. the...
-
Connecting to NAV Web Services from C# using Service Reference (config file version)
Prerequisites Please read this post to get a brief explanation of the scenario I will implement in C# using Web References. For C# we can leave the Service Tier running Negotiate or we can use Ntlm as PHP and Java. In this example I will assume that the Service Tier is running SPNEGO (which is the default) BTW. Basic knowledge about C# is required to understand the following post:-) Version and download I am using Visual Studio 2008 professional with...
-
Connecting to NAV Web Services from C# using Web Reference
Prerequisites Please read this post to get a brief explanation of the scenario I will implement in C# using Web References. For C# we can leave the Service Tier running Negotiate or we can use Ntlm as PHP and Java. In this example I will assume that the Service Tier is running SPNEGO (which is the default) BTW. Basic knowledge about C# is required to understand the following post:-) Version and download I am using Visual Studio 2008 professional with...
-
Edit In Excel R2 – Part 2 (out of 2) – the final pieces
It is time to collect the pieces. The full Edit In Excel R2 solution looks like this Slightly more complicated than the first version – but let me try to explain the pieces NAVEditInExcel is the COM object, which we use from within NAV. This actually hasn’t changed a lot, the only small change is, that the EditInExcel method now takes a base URL, a company, a page and a view (compared to just a page and a view earlier)....
-
Dynamic references to NAV Page Web Services in C# – take 2
In this post from April, I explained how to make dynamic references to page based Web Services, but the post really left the developer with a lot of manual work to do using reflection. So – I thought – why not create a couple of helper classes which makes it easier. Basically I have created a generic NAVPageServiceHelper class, which encapsulates all the heavy lifting of reflection and leaves the developer with a set of higher level classes he can...
-
Extending page Web Services (and creating a Sales Order again)
It has been working in the same way since NAV 2009, but I still get asked often how this works, so why not write up a quick post on this. I also realize that my prior post on how to create Sales Orders through Web Services was made very complex due to compatibility with NAV 2009. This post only works in NAV 2009 SP1 and will show how to extend the Order page with a Post function and show how...
-
Synchronize A/D users to NAV
During my work with demos like Edit In Excel, I wanted to make sure that these things would work in all localized versions of NAV 2009 SP1 – meaning that I needed to install 14 different databases and 14 running Service Tier’s. Having done that, I also wanted to allow my colleagues who needed to check something, access to these service tiers. For a geek (like me:-)), that problem looks like something you need to write an application for, even...
-
Timer events on a page
Have you ever wanted to have an event raised every 10th second on a page in the RoleTailored Client? Wait no more – here is how you can do just that in Microsoft Dynamics NAV 2009SP1. A Timer control is a Non-Visual Add-In I have seen a number of development platforms treat a Timer as a Non-Visual Add-In (including .net) – so I thought I would try to create a non-visual Add-In for NAV – and what better than create...
-
Using touchscreens with the RoleTailored Client
I LOVE the RoleTailored Client, I LOVE the fact that everything is metadata driven and i LOVE what this will give us (us being everybody using NAV) going forward. As a result of the investments leading to NAV 2009, NAV has by far the most modern UX and the new framework allows us to innovate faster and more consistent than any other ERP solution out there. We can change the UX to follow Microsoft Office 2010 if we decide to,...
-
Integration to Virtual Earth – Part 4 (out of 4)
(a small change added that simplifies the SmallVEControl class definition) With the release of NAV 2009 SP1 CTP2 (to MVPs, TAP and BAP) and the official release of the statement of Direction, I can now write about the last part of the integration to Virtual Earth. People who hasn’t access to NAV 2009 SP1, will unfortunately have to wait until the official release until they can take advantage of this post. Please not that you should read Part 1, Part...
-
Dynamic references to NAV Page Web Services in C#
Note: There is an updated post about Dynamic references to NAV Page Web Services here. When creating the very first (never published) version of Edit In Excel, it was loosely coupled, meaning that I did not have any Web references in the project to the Customer Page, Vendor Page or other pages. I read the WSDL and used XPath to traverse the XML and build up structures and I was able to attach to any Page Web Service. The code...
-
Using LINQ with NAV Web Services
In .NET 3.5 Microsoft released LINQ (Language INtegrated Query) – which is a way of writing select statements strongly typed inside your C# code. Wouldn’t it be nice if we could leverage this technology when connecting to NAV Web Services? I thought YES – so I set out to find out what it took… The goal was to be able to replace code like this: CustomerRef.Customer_Service cservice = new CustomerRef.Customer_Service(); cservice.UseDefaultCredentials = true; CustomerRef.Customer_Filter filter = new CustomerRef.Customer_Filter(); filter.Field =...
-
Edit In Excel R2 – Part 1 (out of 2)
This post assumes that you have read the 4 step walkthrough of how to build the Edit In Excel demo from November 2008. You can find the parts here: Part 1, Part 2, Part 3, Part 4 and the Bug Fix. In this post I will talk about what is needed in order to be able to save an Excel spreadsheet on a local disc, edit it offline and then submit your changes later. My first assumption was that this...
-
Edit In Excel – bug fix and R2
If you haven’t read the 4 step walkthrough of how to Edit In Excel from Microsoft Dynamics NAV, you should do so here this post is a follow up to the original posts. I have received a number of suggestions to what you could do with the Edit In Excel and a single bug. In this post I will fix the bug and I will explain what R2 is all about. The Bug The bug description is, that if you...
-
Search in NAV 2009 – Part 2 (out of 3)
If you haven’t read part 1 of the Search in NAV 2009, you should do so before continuing. In this section we will create a small Winforms application, which uses the Web Service we just created in part 1. Our application will be visible as a System Tray Icon, it will have a global Windows Hotkey with which we can activate search and when you activate the Search application it will popup and look like this In part 3 we...
-
Search in NAV 2009 – Part 1 (out of 3)
During the partner keynote and during a couple of the other presentations, we showed a small application, which was able to search in NAV 2009 through multiple tables, display a result set and allow people to drill into task pages in NAV 2009 from the search result window. During the next 3 posts, I will explain how this demo is done and make it available for download. The sample comes with absolutely no warranty, but you can download it and...
-
NAV 2009 and Unicode!
The title might be a bit misleading, but I am writing this post as a response to a problem, which a partner ran into with NAV 2009 – and the problem is caused by Unicode. I am not a Unicode expert, so bare with me if I am naming some things wrong. As you know, NAV 2009 is a 3T architecture and the Service Tier is 95% managed code (only the lower pieces of the data stack is still unmanaged...
-
Edit In Excel – Part 4 (out of 4)
If you haven’t read part 3, part 2 (and part 1), you should do so before continuing here. We have seen how to put code inside Excel, using VSTO and connect to NAV 2009 Web Services. We have seen how to add this to a table inside Excel and how to write data back to NAV through Web Services. We can delete, add and modify records in Excel and we can even do so with both Customers, Vendors and Items....
-
Edit In Excel – Part 3 (out of 4)
If you haven’t read part 2 (and part 1), you should do so before continuing here. In Part 1 and 2, we have seen how easy it is to add a Web Service Reference inside Excel, and use it to get Data. In Part 2 we even had the ability to modify data and send this back to NAV. The original intend was that part 3 would be all about integrating this to NAV on the Client side and part...
-
Edit In Excel – Part 2 (out of 4)
If you haven’t read Part 1, you should do so before continuing here. In Part 1 we saw how easy it is to white .net code inside Excel, and get it executed based on an event in Excel, and how easy it is to fill values into cells. But in order to make this really useful we need to go a different way around. First of all, we need to know more about the record we are working with. We...
-
Edit In Excel – Part 1 (out of 4)
For the last 6-9 months, Microsoft have been showing a demo of how a user could create a filter on a list place and invoke an action called Edit In Excel. This would open Microsoft Excel with the same records, the user selected in the List Place and allow the user to edit values and post modifications back to Microsoft Dynamics NAV, showing how the user would get a runtime error if he was trying to violate validation logic from...
-
Transferring binary data to/from WebServices (and to/from COM (Automation) objects)
A number of people have asked for guidance on how to transfer data to/from COM and WebServices in NAV 2009. In the following I will go through how to get and set a picture on an item in NAV through a Web Service Connection. During this scenario we will run into a number of obstacles – and I will describe how to get around these. First of all – we want to create a Codeunit, which needs to be exposed...
-
The Service Tier
My first technical blog post is going to describe some details about the service tier, that some people might find interesting (and some people might think that this is common knowledge:-)) What is the Service Tier? Very briefly – the Service Tier is the middle tier in a Microsoft Dynamics NAV 2009 installation. This is where all database access is performed and all business logic is executed, meaning also that this is where the application is running. The Database Tier...